
Good Piece, Bad Piece
Hi! My name is Vidar Grahn. I'm a 20-year-old FIDE Master from Sweden, and as part of my journey to the IM title, I study one specific chess topic each week and share what I've learned at the end of it.
This week's topic was "restricting your opponent's pieces," but this specific article will be more about breaking down each piece and how we use them to their best capabilities, while limiting the activity of our opponent's pieces.
(If you want more practical, specific examples of how to restrict your opponent's pieces, feel free to check out my recent lichess study after you've read this article.)
In my opinion, to truly understand what makes a piece good or bad, you need to unlearn everything you already know about the "rules" of piece activity. It's easy to remember that a bishop works well on the long diagonal, that a knight is dim on the rim, or that a rook belongs on an open file. But if we truly want to progress in our understanding of positional chess, we have to go back to basics and think about why each piece belongs where they belong.
I’m sure you’re well aware of how each piece moves, but have you stopped to think about what that movement actually implies? What are the knight's real strengths and weaknesses? Why does a bishop's diagonal movement make it better in some situations and worse in others?
To understand anything on a deeper level, you have to question everything, even something as basic as the piece's movement.
The Knight
The Knight is the most unique piece on the board. It has three very distinctive features: It jumps over other pieces, has a short range L-shape movement, and always lands on a square of the opposite color to the one it started on.
That last detail matters more than it seems. At any given moment, a knight can only influence squares of one color: if it's standing on a dark square, only light squares are within reach, and vice versa. A knight's color-boundness flips with every move, but at any single moment it can still only ever hold one complex, never both, so a sole knight will always need a second piece to cover the color it can't reach.
This is exactly why two knights on opposite color complexes work so well as a pair: one covers the light squares, the other the dark, and between them nothing on the board is out of reach.
 Here's a clear diagram of how effective two adjecent knights can be
This unique movement is exactly what gives the knight both its strengths and its weaknesses. Because it can jump over pieces, the knight thrives in cramped, closed positions where bishops and rooks get stuck behind pawn chains, especially when it can't be kicked away by a pawn. And because its attack doesn't travel along a line, it can never be blocked: there's no square between a knight and its target to interpose a piece on. That's part of why an unrestricted knight near the enemy king is so dangerous: its forks and checks simply can't be parried the way a bishop's or rook's can.
But that same short range and limited mobility is also its curse. The number of squares a knight actually controls depends heavily on where it stands: a centralized knight attacks up to eight squares, one on the rim only three or four, and one stuck in the corner just two. A knight pushed to the edge of the board isn't just awkwardly placed; it's structurally about half as useful as it was in the center.
 Here we can see a centralized knight, a sidelined knight, a cornered knight and their respective movement
It's also slow to relocate; where a rook or queen can swing from one flank to the other in a single move, a knight often needs three or four just to get there, which can leave it stranded on the wrong side of the board during a race.
And since the knight's power lies in the square it occupies, chasing it away becomes very useful. Put these together and you get the concept that governs almost everything about knight play: the outpost. A knight is only as good as the square it stands on, since it depends so heavily on that square being safe from pawns and central enough to matter. Give it one, and it can dominate a game from a single square for the rest of it. Deny it one, and you've taken away most of what makes the piece dangerous in the first place. That's really what restriction means for a knight.
The Bishop
You obviously already know how the bishop moves: diagonally, any number of squares, on one of two color complexes for the whole game.
Unlike the knight, the bishop is a long-range piece, and that changes what "restriction" even means for it. Forcing a bishop to retreat is often meaningless, since it can perform the exact same job from three squares back as it could up close; the diagonal is what matters, not the exact square on it. That's the mirror image of the knight, which loses its function the moment it's pushed off its post.
The quick movement means it has a big advantage in an endgame against a knight, where the game is played on both flanks. The bishop can target weaknesses on each side, while the knight can usually only defend one.
However, that same diagonal movement comes with a real cost: because a bishop only ever moves diagonally, it's stuck on the same color square for the entire game. Where a knight can eventually reach any square on the board, a bishop covers exactly half of it, forever. That means any weakness on the color it doesn't control is a weakness that bishop, alone, can never punish. And if it's ever traded off, or its color-complex partner disappears, whatever weaknesses exist on the "wrong" color become permanent. This is why the “bishop pair” is such a praised concept in chess. With two bishops you can control both square-colors simultaneously.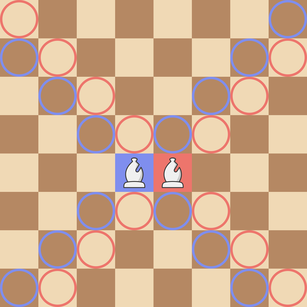
This color-boundness is also what makes color complexes such an important idea when restricting a bishop. Putting all your pawns on one color strengthens your grip on that color but weakens the other, so the straightforward way to restrict an enemy bishop in the middlegame is to fix your own pawns on its color, leaving it with nowhere good to go.
 The dark-square bishop is reduced to a "tall pawn"
The catch is that this costs something down the line: a pawn chain sitting on one color only defends itself along that same diagonal, not from behind, so if the game simplifies into an endgame and that bishop ever breaks through and wins one pawn, the rest of the chain often falls with it.
Even better than restricting the bishop with our own pawns is getting the opponent to trap it behind their own: that way it costs us nothing, and it's a structural problem they usually can't undo. We can occasionally force exactly this by pushing our own pawns onto the color opposite the bishop, which locks the opponent's central pawns onto the bishop's own color in response. This is one of the most common patterns in the opening, most famously in the French Defense, where Black's light-squared bishop regularly ends up boxed in behind its own e6 and d5 pawns for exactly this reason. The infamous "french bishop"
Put these together and the guiding idea for restricting a bishop is almost the opposite of the knight's: where a knight needs a safe square, a bishop needs an open diagonal and the right color complex to work with. Take either away (close the position around it, fix its pawns onto its own color, or force its color-complex partner off the board) and you're left with a piece that can see the whole board but can't actually touch any of it.
The Rook
The rook is another long-range piece, and unlike the bishop, it isn't tied to one color for the entire game: it can switch complexes freely as it slides along ranks and files. But a rook's power lives entirely on the one line it currently occupies; it has no diagonal reach to fall back on the way a bishop does. That means if a rook ever gets stuck behind a pawn on its file, it has nothing else to offer from that square: it can't look past the pawn in front of it, and its only remaining job is to guard it. It might still cover the rank it sits on, but that's about the extent of it.
This is exactly why an active rook is worth so much more than a passive one, even though the two are materially identical. A rook tied down to defending a single pawn contributes nothing else to the game: it can't support an attack, contest a file elsewhere, or infiltrate the back rank. So one of the most effective ways to restrict a rook isn't to attack it directly at all, but to hand it a weakness it has to babysit: fix a backward pawn it's forced to defend, and for the rest of the game that rook is functionally removed from the position without you ever having to touch it.
 The a8-rook is stuck defending a7
The other major restriction technique follows from where rooks want to be in the first place: open files. A rook on an open file can reach almost anywhere on the board in a single move, so the natural way to neutralize it is to close that file, usually by parking one of our own pieces on it to block the line. Even better, as with the bishop, is forcing the opponent to block it themselves: if their own piece or pawn ends up sitting in front of their rook, the file is closed just as effectively, and it costs us nothing to arrange.
Here is a classic example of forcing our opponent to block their own file:
Put these together and restricting a rook really comes down to activity rather than geometry: where a knight needs a safe square and a bishop needs an open diagonal on the right color, a rook just needs something useful to do. Take that away (tie it to a static defensive task, or shut the file it lives on) and a rook can sit on the board contributing nothing at all, no matter how active it looks on paper.
I hope I was able to shift your perception of what it means to have an active piece in chess! Please leave a like if you found this article useful or enjoyable, it helps me a lot <3
Now that you know what piece is a good piece and what is a bad piece, I highly recommend to test out my interactive study where I have a lot of exercises on restricting pieces:
You may also like
 FM Zig_Zag_Zug_Zwang
The Pyramid of Evaluation [Part 1]
There is nothing more important in chess than the ability to evaluate a position. Without it, you ca… FM Zig_Zag_Zug_Zwang
I Analyzed 100+ Games In The Italian... This Is What I Learnt:
Hi! My name is Vidar Grahn. I'm a 20-year-old FIDE Master from Sweden, and as part of my journey to … ChessMonitor_Stats
Where do Grandmasters play Chess? - Lichess vs. Chess.com
This is the first large-scale analysis of Grandmaster activity across Chess.com and Lichess from 200… FM MathiCasa
Chess Football: A Fun and Creative Variant
Where chess pieces become "players" and the traditional chessboard turns into a soccer field FM Zig_Zag_Zug_Zwang
How Masters See the Board
My friend studying psychology sent me this picture from one of his books: thibault