
chatGPT
Force your opponent to checkmate you
This article is all about the selfmate genre in chess compositions. Reading this article will cost you at least 100 Elo points, but hopefully it will still be worth it
A widespread and popular genre in the world of chess composition is the so-called selfmate. It essentially turns the normal task of direct mate on its head.
The goal is not to checkmate the opponent's king, but one's own! And the opponent will do everything in their power to not checkmate us. We therefore have to force Black to checkmate us, since he will not do so voluntarily. So you win when you lose and you lose when you win.
First example
A simple example should illustrate this idea. It is a selfmate in 2 (notation: s#2).
Of course, White can checkmate with 1.Qxh2, but this is the wrong king! It is the white king that wants to be checkmated, and Black
wants to prevent this. Therefore, only 1.Qe1 g3 2.Qb4 g2# works. 2.Qb4 has to be played to stop the black king from moving to g4 or h4.
2.Qe4 is also not possible because from e4 the white Queen defends the mating square g2.
This simple example reveals some essential aspects of a selfmate.
Often, but not always, Black is forced to give mate with the help of zugzwang.
Furthermore, both the white king (which wants to be checkmated) and the black king have to be controlled (as otherwise it could make a non-mating move), which means that more complex selfmates often use a larger number of pieces.
Beautiful complex example
To avoid boring you, here is a first treat in form of an excellent selfmate. It is a selfmate in 8 moves by Mark Kirtley.
Looking at the initial position, it may seem completely impossible to see how the white king is supposed to be checkmated, and then against Black's will at that. But it all works out perfectly! Behold:
It is very worthwhile, when playing through it for the second time, to think about why White moves exactly as he does and why no other order of White's moves works.
Black has counterplay
Often, Black has no real counterplay, but in the solution sequence has exactly one legal move each time. Selfmates in which Black also actively plays are more difficult to construct, but naturally all the more beautiful. The Austrian Camillo Gamnitzer in particular is an expert in this area. In the following selfmate composed by him, White and Black engage in a true tug-of-war. It is a selfmate in 7 moves.
Here too, it is not immediately apparent how the white king is supposed to be checkmated against Black's will. Basically, White's plan is to move the rook via d4 to a4 as a self-block and then play Qb6+ on the next move to force cxb6#.
However, immediate 1.Rxd4 is too early, since nothing is threatened, and if Black makes any arbitrary move, the white move 2.Ra4?? would even checkmate the black king.
For this reason, White first employs a different threat, which arises after the key 1.Rd7!. This move threats 2.Qb5+ cxb5 3.Rxc7+ Bc7#.
For this reason, in the main variation the black bishop gives up control of c7 and plays Bf2.
Now White's idea 2.Rxd4 works, since after Ra4 the black king would not be checkmated because of Bf2xe3.
For this reason, the black bishop moves back to g3, but is followed by the white bishop. This forces Black to move the Bishop to d6, the only square on which he would not prevent his own defensive checkmate after Ra4.
Now comes the surprising 4.g4!!, which brings the black rook into play. Since g4 once again threatens Ra4, Black has little choice but to capture it with
4...Rxf2 (or 4...Rh1 as a side variation).
However, activating the black rook introduces new mating motifs, which White exploits in the final moves.
von Broecker matrix
In the next example, it is clear how White wants to be checkmated but it is still very hard to force black to do so.
In the following tempo duel, Black's best moves have to be considered very carefully.
This selfmate in 9 moves, composed by Gustav von Broecker and already published in the year 1892, is still considered one of the best and most beautiful selfmates to this day!
To understand this problem, it is useful to solve it backwards. The only position in which Black has to checkmate White is this one, with a black bishop on b7, the white bishop on c6 and the white rook on h8. Only in this case Black is in zugzwang and has to play Bb7xc6 checkmating White.
During the solution, the rook must never stand on the same file as the white bishop or to its right (except at the correct moment on h8), as otherwise the rook would prevent the mate.
For this reason, the try 1.Rh8 suggests itself, but it fails to ...Bf3!, after which the tables are turned and White is the one who is in zugzwang.
The correct moment for Rh8 is therefore only after Black himself has played Bf3 (or exactly one square next to our white bishop).
For this reason, the rook has to move to the left, but it must not go too far, since otherwise the rook runs out of space on the left and could never move to h8 at the right moment.
In fact, there is a reciprocal correspondence between the square pairs (e8, c6), (d8, d5) and (c8, e4). If Black moves to c6 and White can subsequently move to e8, then White can force his own checkmate. If, however, White moves to e8 himself and Black can subsequently move to c6, then Black is always one step ahead. The same applies analogously to the other square pairs.
That is exactly the reason why the first move has to be 1.Rf8! setting Black in zugzwang. White wins now by moving to the square that corresponds to the square Black has just moved to each time.
As soon as the black bishop is exactly one square diagonally adjacent to our bishop, our rook can safely move to h8. The black bishop is then chased by our bishop until the position with the black bishop on b7 and the white bishop on c6 is reached.
If the black bishop tries to retreat to b7 during the solution, we move our bishop forward by exactly the same number of squares as the black bishop moved backwards. For example, if Black plays the Bishop from d5 to b7 (2 squares) we move our Bishop from g2 to e4 (also 2 squares) and so on.
Pawn Promotions
Of course, underpromotions also occur in selfmates. While in the orthodox area, a promotion to a rook or bishop can only be justified by stalemate, the justifications for an underpromotion in a selfmate can be more varied.
An example can be seen in the following selfmate in 4 moves by Michel Caillaud.
Thematically, it features two Phoenix underpromotions, meaning that White sacrifices his rook and bishop respectively in order to regain them through underpromotion. A queen promotion would be incorrect, as it would prevent the white mate by interposition.
Of course, an Allumwandlung (german term for all-promotion) can also be represented. In my opinion, one particularly beautiful example, in which four different pieces appear on the same square within five moves, is by Peter Hoffmann (s#5).
In particular, why the second and third promotions have to happen in exactly this way is worth thinking about.
Another problem dealing with black promotions has been added as a problem to solve at the end of the article.
Motive Inversion
A theme that works exclusively in a selfmate is the so-called motive inversion. Here, a black defensive idea has both a useful side and a harmful side. But the disadvantage and the advantage of the defensive idea are identical.
The selfmate in 2 by Karol Mlynka illustrates the idea:
The key is 1.Qc3, which threatens 2.Rxf4+ Sxf4#.
Black has now three defenses:
- 1...h1Q in order to pin the white rook, which can therefore no longer play 2.Rxf4+,
- 1...c1Q or 1...cxd1Q in order to pin the black knight, which can therefore no longer play 2...Sxf4#, and
- 1...Rf7 to unpin the knight on e6, allowing it to capture the black mating knight on f4.
In all three cases, however, Black's defensive move is turned against him:
- 1...h1Q pins the white rook, but because the white rook is now pinned, 2.Sxe3 Sxe3# works.
- 1...c1Q / cxd1Q pins the black knight, but because the black knight is now pinned, 2.Qe5+ dxe5# works.
- 1...Rf7 unpins the knight on e6, but because the knight is now unpinned, 2.Sg7 Txg7# works.
Note that in all three cases the threat created by 1.Qc3 does not work, meaning that Black's moves genuinely have a positive effect and defend against the original threat. But precisely the positive effects that defend against the original threat gives White a new continuation and thus harm Black.
This is not possible in an orthodox mate, where the drawback and the benefit are of different natures.
I hope some of these problems have inspired you to take a closer look at the many ideas and themes that can appear in a selfmate, and shown you that the genre absolutely deserves its place in the world of chess composition.
Selfmate to solve
To conclude, the promised selfmate, it is a selfmate in 2 moves by Rud Prytz, Skakbladet, 1934. The Dane Rud Prytz was a great selfmate composer of the early 20th century, so the solution will definitely be worth it. Of course, it is all about black's pawn promotions.
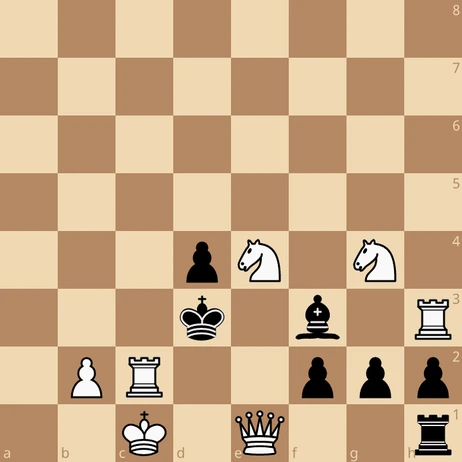
8/8/8/8/3pN1N1/3k1b1R/1PR2ppp/2K1Q2r w - - 0 1
If you haven't found the solution, you can ask in the forum for it.
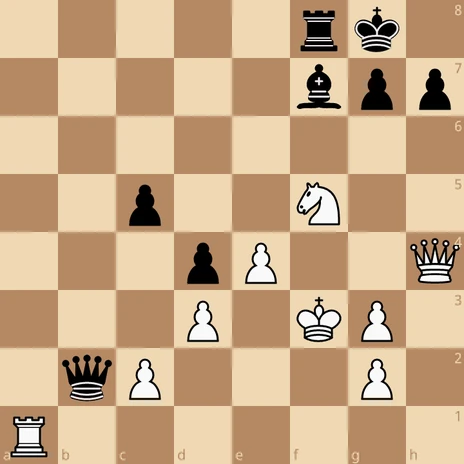
If you want an "easier" one i'm sure you'll find the selfmate in the following position immediatley. Probably it was set up by Josef Krejcik who wrote a lot of satires, so it was probably not from a real game, but i don't know it exactly.
You may also like
 thibault
How I started building Lichess
I get this question sometimes. How did you decide to make a chess server? The truth is, I didn't. DeepHuman_95
What the knight?! Knight-weels and selfblocks
In this article, i show you two beautiful and classic motifs from the world of chess composition: kn… DeepHuman_95
The Beauty of chess compositions
What if some of the most beautiful ideas in chess never occur in actual games? If you're also tired … CM HGabor
How titled players lie to you
This post is a word of warning for the average club player. As the chess world is becoming increasin… FM MathiCasa
Chess Football: A Fun and Creative Variant
Where chess pieces become "players" and the traditional chessboard turns into a soccer field NM ZugAddict